


How to Authenticate Older Banknotes
• TABLE OF CONTENTS •
A Brief Background on U.S. Currency
What are Older Banknotes?
How do Newer Banknotes Differ?
The Four Steps You Must Do To Authenticate Older Banknotes
Design Features of Older Banknotes
TL;DR: A lack of security features makes authenticating older banknotes - money that is Series 1988A and older - harder than authenticating banknotes that are Series 1990 and younger, which is why it is important to know the specific design features and their changes over time for each denomination. Click here to jump to our design features list.
In addition, we’ve distilled this post into two PDFs for your convenience: the first – “Design Features of Older Banknotes” is a detailed 21-page guide on the changes in design features and the second – “Old Money Authentication” is a brief, less-detailed one-page guide. Depending on your and/or your organization’s needs, you may find one guide more helpful than the other. Click here to download the guides.
All U.S. currency remains legal tender, regardless of when it was issued – the release of a new design does not mean bills with older designs are no longer valid.
A Brief Background on U.S. Currency
This section is designed to give an understanding of why the U.S. monetary system is the way it is today. It’s not needed to understand why there’s a need to authenticate money – you need to authenticate money because counterfeit money exists and exists in large quantities – it’s simply background that helps to put the rest of the sections into perspective.
To jump to our definition of an older banknote, click here; and to jump to the list of how to authenticate older banknotes, click here.
There are three components that have given the structure for the U.S. currency system as we know it today:
- The introduction of federal paper money = The method of money production
- The establishment of the Federal Reserve System = The method of money distribution
- Legal tender = The definition of legally-valid money
Although the United States had been a country for close to a century at the time, the federal government didn’t officially start printing paper money (notes) until 1861, in order to fund the Civil War that had just begun without raising taxes. Prior to the Civil War, the only form of legal tender were silver coins.
Money functioned similarly to the IOU-method: the notes, known as ‘Demand Notes’, were payable on demand in coin from certain Treasury locations.
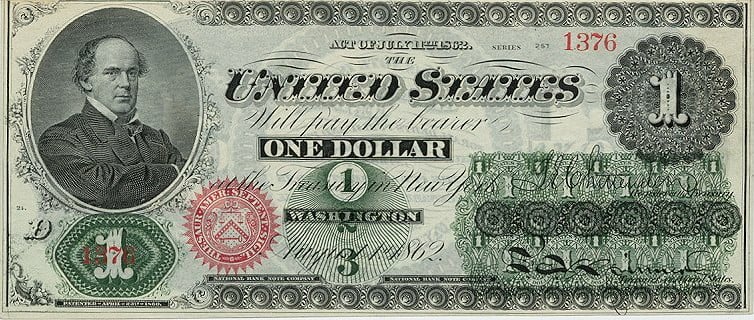
For the first year, a private firm made money that was given worth once signed by clerks at the Treasury because there was not yet a government facility capable of printing money. This method of production was inefficient and so the Second Legal Tender Act, passed in 1862, gave the Treasury Secretary the authorization to engrave and print notes at the Treasury Department. These notes, known as ‘Legal Tender Notes’ or ‘United States Notes’, were engraved with fine-lines, detailed geometric lathe-made patterns, and signatures, and printed with a Treasury seal.
In essence, these bills – the Legal Tender Notes - were the first iterations of the money we have today.
The current system of U.S. currency was set up through the Federal Reserve Act which was passed by Congress on December 23, 1913.
Anxiety surrounding Wall Street and its potential crises led to several financial panics during the end of the 19th century and the beginning of the 20th century, prompting legislation that would move the monetary system out of Wall Street’s hands and into a centralized banking system that was publically (aka federally) run. Through the Federal Reserve Act, 12 strategically-placed Federal Reserve Banks were established that issued currency, known as ‘Federal Reserve Notes’, that was standardized by the government.
The current monetary system as we know it today was set up through the Federal Reserve Act and the only banknotes that are still issued are Federal Reserve Notes. All other notes, such as United States Notes, have ceased in production and distribution several decades ago.
You may have noticed in the statement above this section the phrase “legal tender”. Legal tender means the banknotes that must be accepted as payment for both public and private debts.
Officially, legal tender is defined as any banknote that is backed by the United States Treasury Department; as mentioned above, this didn’t occur until the passage of the Second Legal Tender Act in 1862. All U.S. currency issued 1862 or later is considered legal currency. If you are a business owner and you come across a $10 banknote from 1900 that a customer would like to use to purchase an item, do not worry – you are under no obligation to accept legal tender as payment; the validity of legal tender concerns debts.
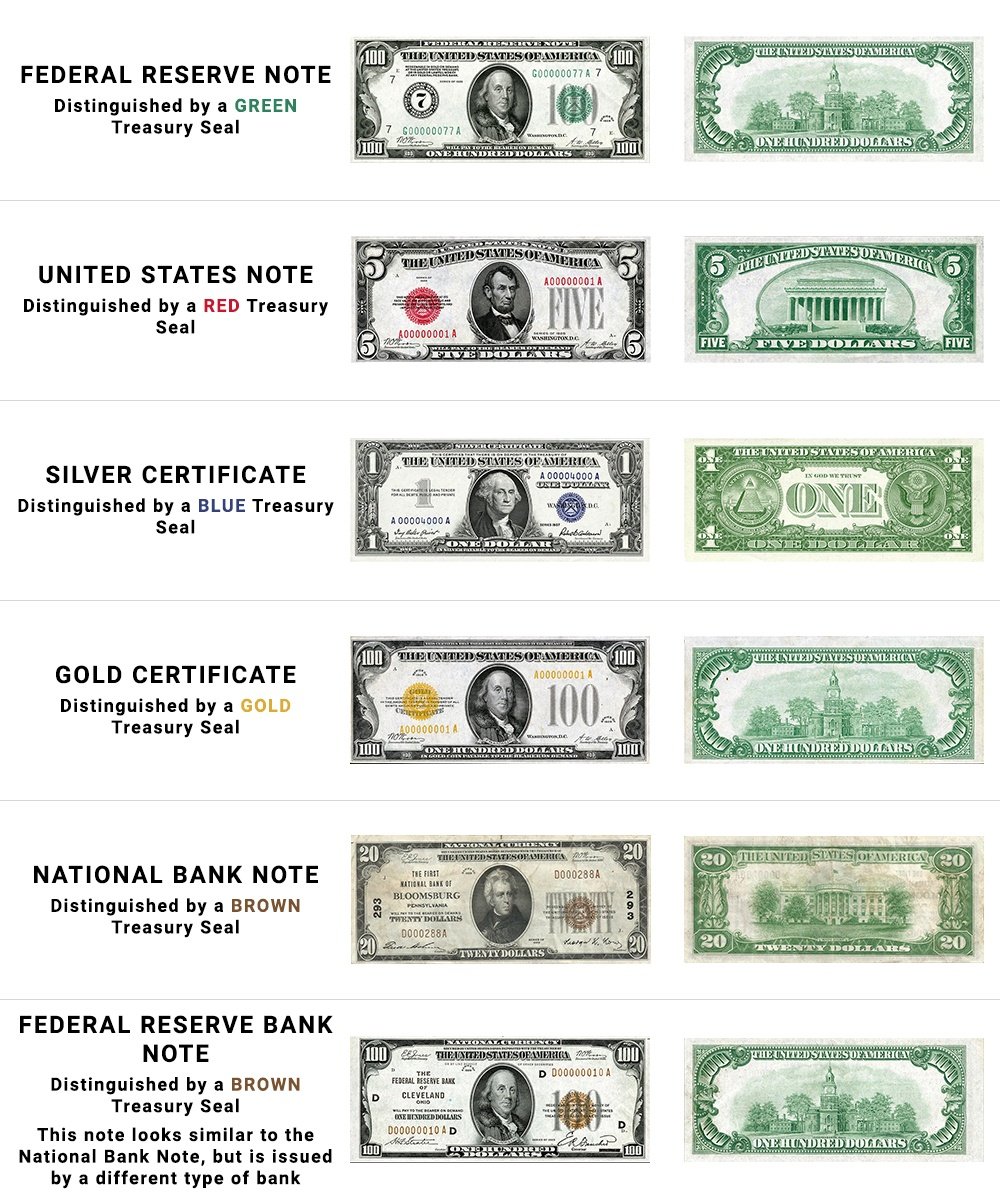
To be comprehensive, there are still six types of legal tender in the United States, but only one is still being issued:
- Federal Reserve Note – the only note still being issued
- United States Note – distribution ceased January 21, 1971
- Silver Certificate – distribution ceased in 1964; redemption for silver dollars ceased on May 25, 1964
- Gold Certificate – (public) distribution ceased in 1933; redemption for gold coins ceased on January 17, 1934
- National Bank Note – distribution ceased in 1935
- Federal Reserve Bank Note – distribution ceased in 1945
Considering all banknotes except the Federal Reserve banknote have not been produced since the 60s, there is almost no chance that you’ll run into any banknote other than a Federal Reserve banknote.
If, as a business, you accept money and you come across a customer attempting to pay with a banknote listed above that is not a Federal Reserve Note, you should ask the customer for another bill or form of payment and direct him or her to exchange the note for a Federal Reserve Note instead of accepting the note as payment. The rarity of these types of instances means it is much more efficient to have the Treasury or financial institution authenticate the note than to authenticate the note yourself.
If, for whatever reason, you come across a banknote listed above that is not a Federal Reserve Note, take the banknote to a Treasury building or financial institution so that it can be exchanged for its face value as a Federal Reserve Note(s).
A Brief Background on U.S. Currency
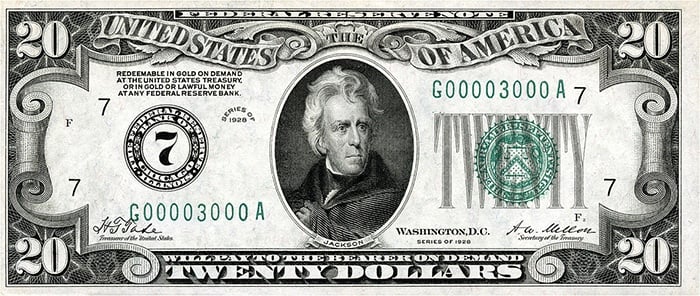
For the purposes of this post, ‘older banknotes’ refer to Federal Reserve banknotes that are Series Year 1928 or later to a Series Year prior to 1990.
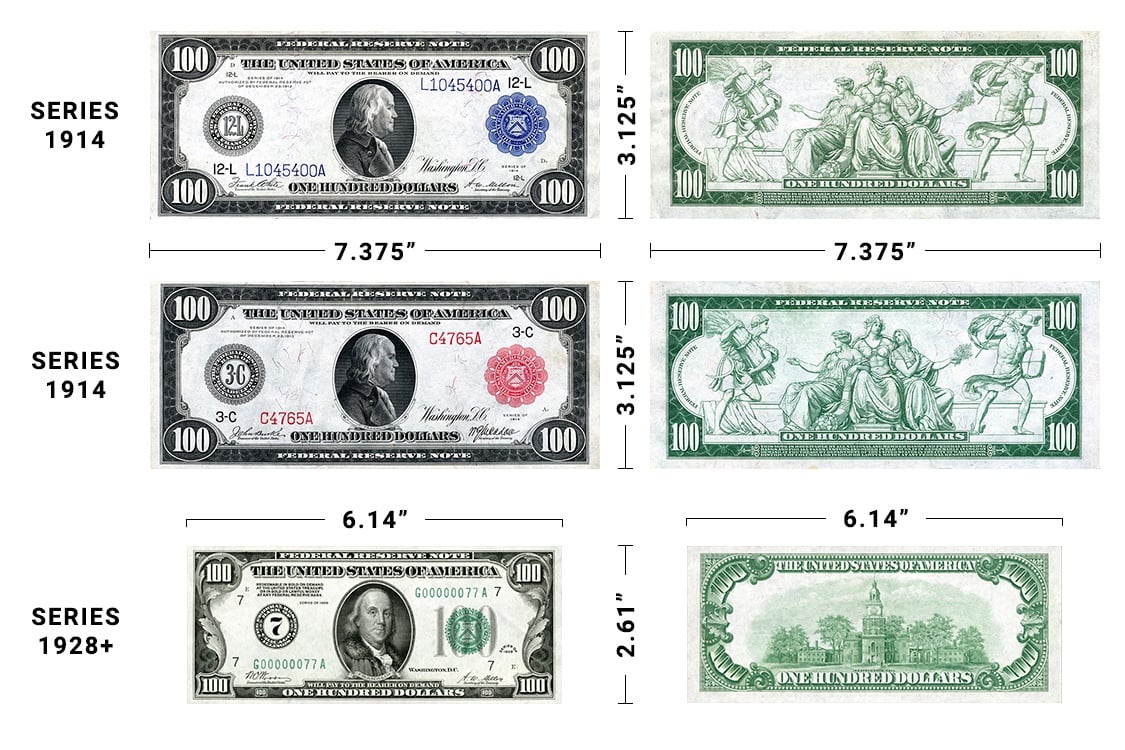
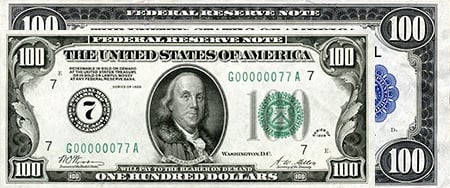
Banknotes, including Federal Reserve Notes, that was issued prior to Series 1928 are larger - 7.375 in x 3.125 in - than those issued Series 1928 and later - 6.14 in x 2.61 in. These ‘large-size’ notes, like the discontinued banknotes that are still considered legal tender mentioned above, are quite rare and unlikely to be used in circulation. In addition, these banknotes would theoretically be valued more than it’s the denomination on its face, if in relatively good condition – so it would be highly suspicious if anyone would try to spend these notes.
Did you know that there used to be larger denominations than the $100 bill? There used to be the $500, $1,000, $5,000, $10,000, and $100,000 bills; these large denominations stopped being issued by the Treasury in 1969 and are pulled from circulation and destroyed whenever they are received by a bank. Although it is still technically legal tender, and you could still technically receive back its face value in smaller denominations from a bank, these bills are worth more than their face value – you’d be much better off leaving it out of circulation and keeping/selling it as a collector’s item. For example, $10,000 bill that is kept in pristine condition could be worth as much as $140,000.
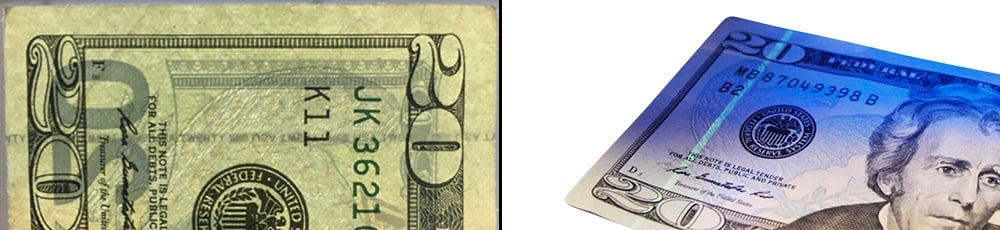
Banknotes with a Series Year prior to 1990 do not have the security features with which we’re all likely familiar, such as watermarks or the security thread. The only security feature that exists on these types of notes is raised printing.
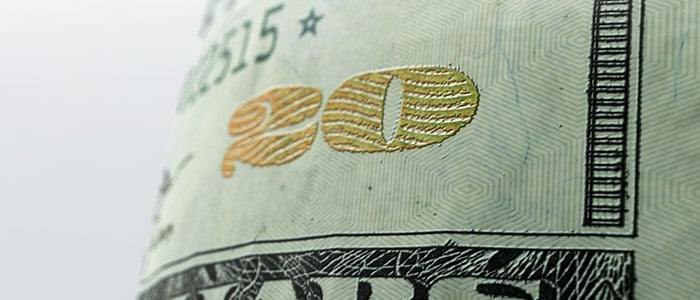
‘Raised printing’ is exactly what it sounds like: printing that is raised. You can feel for raised printing by moving your finger along the surface of bills – it’s what gives bills their distinct texture.
Security features on banknotes are characteristics that are intentionally hard to reproduce. Raised printing, for example, cannot be mimicked using a regular printer, such as those found in homes and offices.
The raised printing security feature found on U.S. currency is currently produced by using a printing method known as intaglio printing, in which engravings on steel plates are pressed onto special paper in order to give the printed areas its distinctive look and feel. Past methods of achieving raised printing also utilized engravings, put were pressed into paper using another method, such as by hand.
As mentioned above, raised printing basically existed as a security feature since 1862, when the Treasury first started issuing paper money. However, due to the fact that the engravings used to create pre-1862 currency were neither federally issued nor approved, the existence of raised printing on a bill could not be used to determine the bill’s authenticity.
Any and all bills with a Series Year earlier than 1990 only have one security feature: raised printing.
How do Newer Banknotes Differ?
Although counterfeit money has been a problem ever since the money was invented, U.S. currency, since the establishment of the Federal Reserve, was hard to produce passably until modern printing technology was created. This modern technology allowed counterfeiters to easily and quickly produce enormous amounts of counterfeit money that was incredibly similar to real money, considering the only security feature was raised printing.
The sheer amount of realistic counterfeit money finally prompted the government to redesign U.S. currency to include more security features, in order to make it hard to passably reproduce.
And so in 1990, starting with the $100 bill, two additional security features were added: a security thread and microprinting. The following is a list of the Series in which security threads and microprinting were added to each denomination:
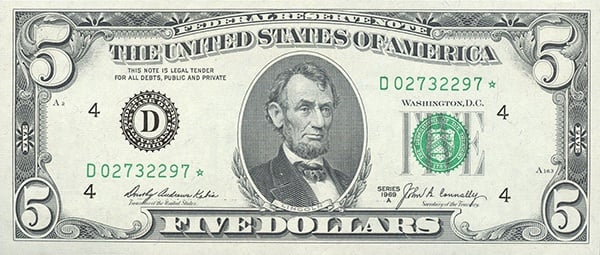
- $5: 1993
- $10: 1990
- $20: 1990
- $50: 1990
- $100: 1990
Then, in 1996, color-shifting ink and watermarks were first added, starting with the $100 bill. The following is a list of the Series in which color-shifting ink and watermarks were added to each denomination:
- $5: 1999 (watermark only)
- $10: 1999
- $20: 1996
- $50: 1996
- $100: 1996
Finally, in 2013, one more security feature – the 3-D security ribbon – was added, but just to the $100 bill (Series 2009 and later).
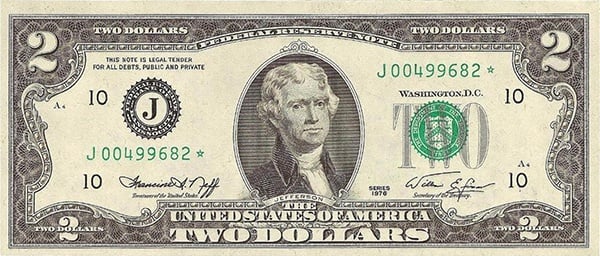
You may have noticed that two bills – the $1 bill and the $2 bill – do not appear on any of the lists above. Ever since raised printing was added as a security feature to the $1 bill in 1963 and the $2 bill in 1976, those two bills have remained as is. To be clear, the only security feature that exists on the $1 bill and the $2 bill is raised printing.
The $1 and $2 bills have not been issued with additional security features due to the fact that these two bills are infrequently counterfeited. Counterfeiters tend to not manufacture fake $1 and/or $2 bills since the amount of profit per bill may not offset the cost and time of production enough to make fiscal sense.
All $5 bills, $10 bills, $20 bills, $50 bills, and $100 bills currently have more security features than just raised printing, allowing for easier authentication of those bills – since there are more security features that you can check.
If you’d like information on how to authenticate newer bills by checking their security features, check out our previous post.
The Four Steps You Must Do to Authenticate Older Banknotes
This has caused many businesses and retailers to ponder the question: what can an employee/cashier do to authenticate older bills?
The short answer, unfortunately, is not much. The most effective method for authenticating older banknotes is combining constant vigilance with knowledge about the details on what each denomination is supposed to look and feel like.
There are four steps that we recommend you take in order to authenticate these bills; each step is expanded upon below.
- Check for raised printing
- Make sure that the lines and points on the bill are distinct and unbroken
- Check that the paper the bill is printed on does not glow under UV light
- Know what the denominations looks like and know when design changes occurred
As mentioned above, each older denomination has raised printing as a security feature.
So, the first step in authenticating older banknotes is to run your finger along the surface of the bill.
If the bill is smooth like a regular sheet of paper, there’s a chance that the note is counterfeit, but sometimes older bills have worn down enough that the raised printing feature is not readily discernable. Additionally, printing technology has become advanced and ubiquitous enough that many criminals can easily replicate the raised printing feature so that it is almost indistinguishable from genuine raised printing - which is why you also need to perform the next step:
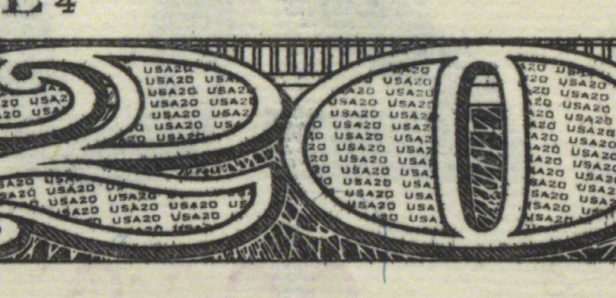
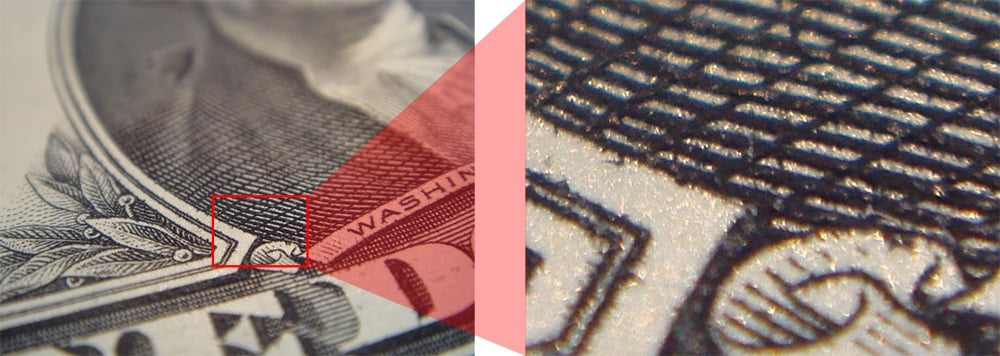
The second step is to take a close look at the lines and points that make up the design of the bill to see whether or not they are distinct and unbroken.
Depending on the sophistication of the design and printing technology a counterfeiter is using, the lines and points on a bill may be unclear and/or blurry. However, as mentioned above, technology has advanced and become ubiquitous enough that producing a counterfeit bill with distinct and unbroken lines is easier and cheaper than ever – which is why you also need to perform the next step:
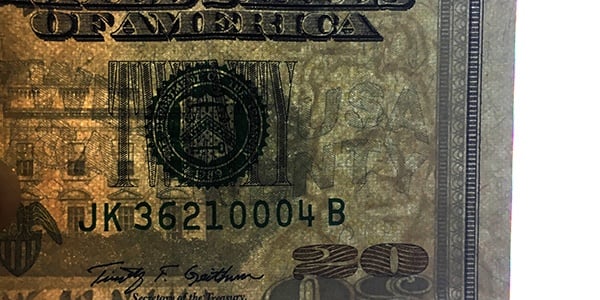
The third step is to place the bill under a ultraviolet (UV) light source to make sure that the paper itself does not glow.
The paper that real money is printed on absorbs light as opposed to reflecting it, which gives it a dull appearance under UV light. Regular paper, such as computer paper, should glow under UV light. However, a favored method of counterfeiting money is to bleach a low denomination, such as a $1 bill, and print a higher denomination, such as a $20 bill, onto it. Since such a counterfeit would look like a real bill under UV light, you also need to perform the last step:
The fourth and final step is to make sure that you know what each denomination should look like based on the Series year and know when each major design change occurred.
There are differences between the Series years for each denomination – some more subtle than others. Sometimes, when a counterfeiter changes some design features to make a stack of counterfeit bills less suspicious (since no real bill looks exactly like another – consider the serial number), he or she may inadvertently change a design feature that does not fit the Series year.
Additionally, if you do not know the differences in design features, you may end up becoming suspicious of a real, genuine bill since a certain design feature is different than what you’re used to. Since you don’t want to alienate loyal customers who happen to have a genuine, yet older bill, you should take the time to learn about the design features and their changes over time.
Design Features of Older Banknotes
The following is a list of design features as well as their locations on each denomination.
Note: the year a bill was issued does not necessarily correspond to the Series year that is printed on the front of the bill. The Series year indicates the earliest year that the design of the denomination was issued. Anytime a major design change is introduced for a denomination, the Series year is updated. Anytime a minor design change – for example, when there is a new Treasurer of the United States and therefore, a new signature – is introduced for a denomination, the letter suffix is added to the end of the Series year. As an additional note, a new Secretary of the Treasury has been categorized as reason for a major design change since 1974.
Raised Printing
Unlike the rest of this list, this feature is technically a security feature since it is not as easy to reproduce as design features, especially without specialized machinery. As mentioned above, raised printing describes the result of a process known as intaglio printing that literally raises the areas on which ink is printed. This process is what gives money the unique texture that it does when a finger is run over the surface of a bill.
Raised printing has been around for quite some time, as far back as the time the United States only existed as the thirteen colonies. But raised printing on currency as we know it was not issued in a federally standardized form until 1914, after the establishment of the Federal Reserve the year prior.
If you can feel the raised printing on a bill, the bill is likely real, but you should still check for the rest of the design features mentioned on this list, just in case.
If you cannot feel the raised printing on the bill, it doesn’t necessarily mean the bill is counterfeit - considering old bills may be worn down enough that the raised printing may have become less discernable - but it does mean that you should check all the other design features mentioned on this list.
"Federal Reserve Note"
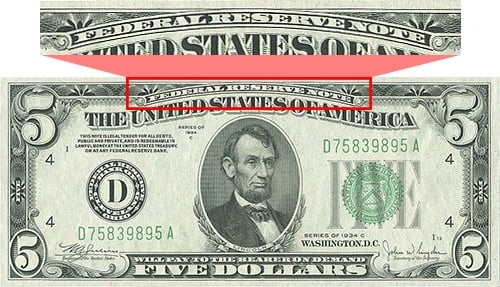
“FEDERAL RESERVE NOTE” should appear at the top of every bill.
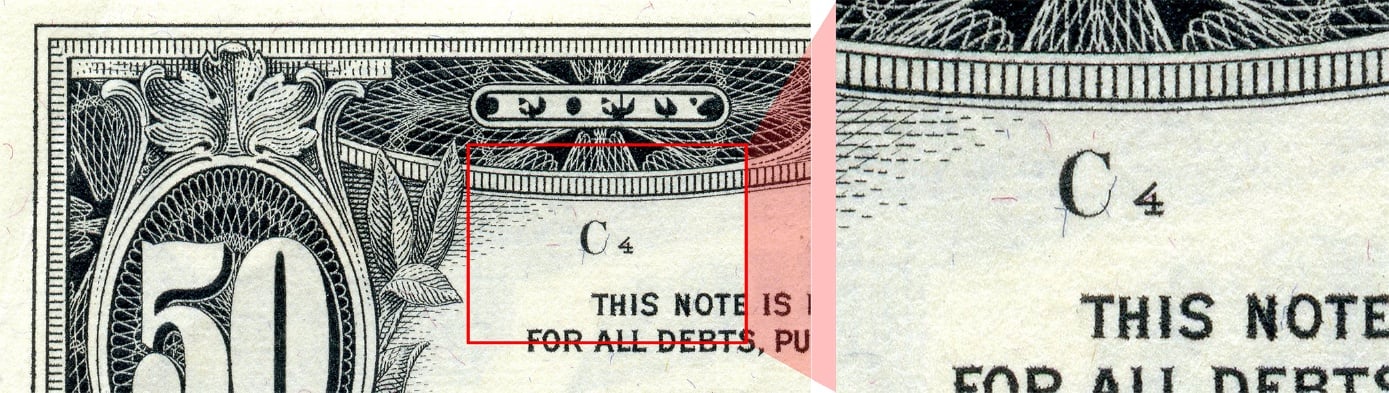
Note Position
The note position indicates that particular bill’s position on a printing sheet during the production of the bill and is located at the upper left corner. Although you cannot determine the accuracy of the Note Position itself, you can determine whether or not a Note Position on a bill is at least legitimate or not. Depending on the Series year of a bill, you can determine, at least, whether or not a Note Position exists for that Series.
- All $1 and $2 bills should have a note position that is composed of a ‘check letter’ and a ‘quadrant number’. The check letter should be an uppercase letter A-H, inclusive, and the quadrant number should be a number 1-4, inclusive
- All $5, $10, $20, $50, and $100 bills prior to Series 1950A should have a note position that is a letter A-L, inclusive
- All $5, $10, $20, $50, and $100 bills Series 1950A-1950E, inclusive, should have a note position that is a letter A-R, inclusive
- All $5, $10, and $20 bills Series 1963 and later and all $50 and $100 bills Series 1963A and later should have a note position that is composed of a ‘check letter’ and a ‘quadrant number’. The check letter should be an uppercase letter A-H, inclusive, and the quadrant number should be a number 1-4, inclusive
Face Plate Number
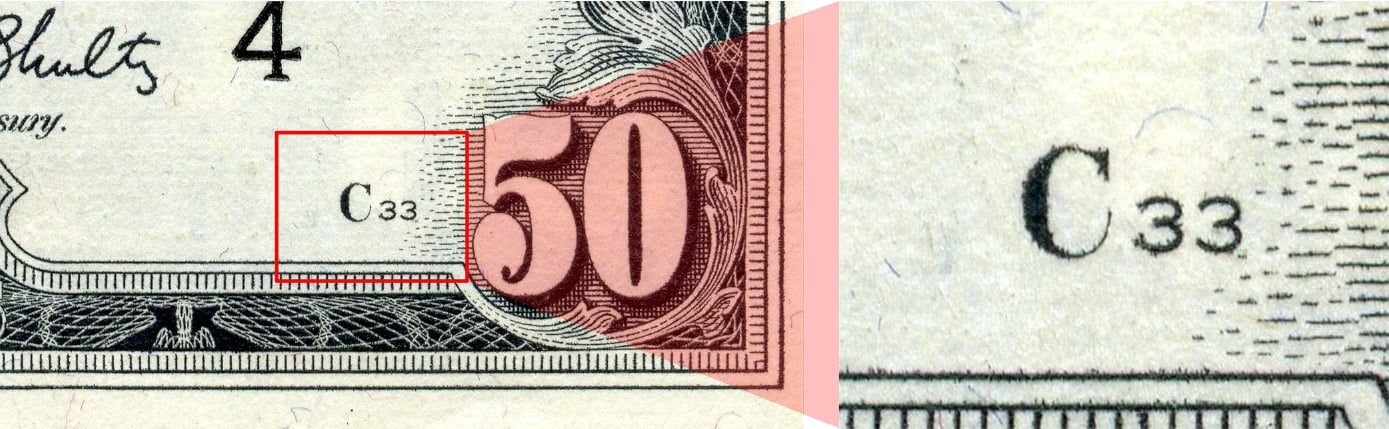
The face place number indicates the particular printing plate that was used to produce the front of the bill and is located near the lower right corner on the front of the bill. The letter in front of the face plate number should be capitalized and the same as the letter of the note position. The face plate number ranges from single-digit numbers to four-digit numbers.
Back Plate Number
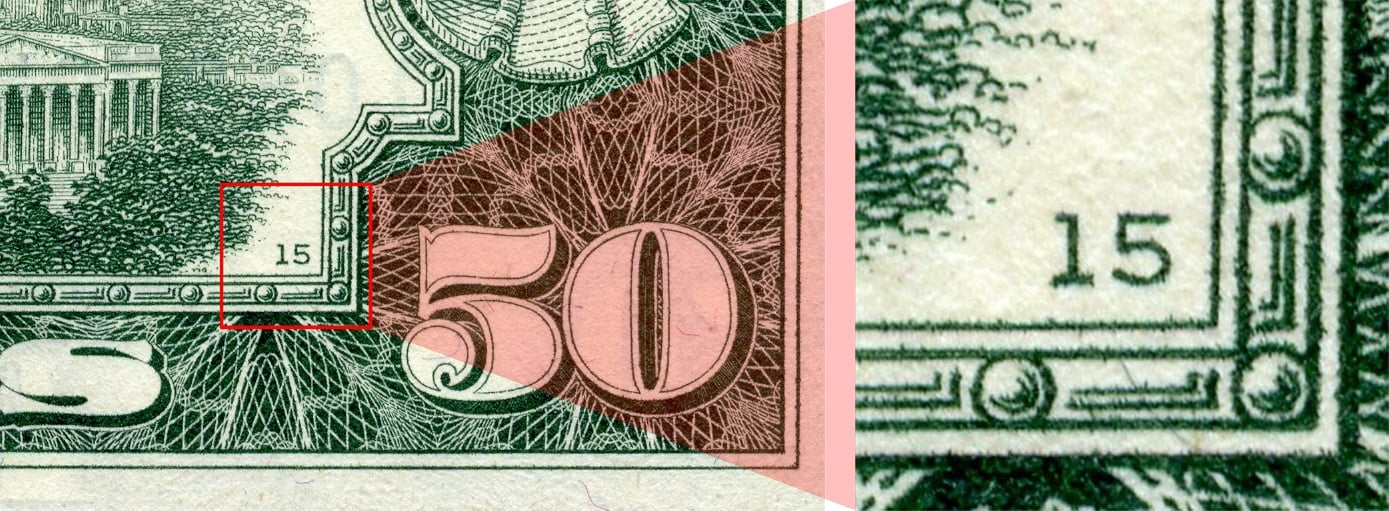
The back place number indicates the particular printing plate that was used to produce the back of the bill and is located near the lower right corner of the back of the bill. The back plate number ranges from single-digit numbers to four-digit numbers.
Size of the Bill
Each bill should be exactly 6.14 in x 2.61 in – if a bill is any other size, then it’s counterfeit. Of course, the size of the bill is probably the one thing counterfeiters produce correctly, out of all the design and security features. If the bill is another dimension than 6.14 in x 2.61 in, the bill is counterfeit. As mentioned above, this became the official size of the bill starting with Series 1928. If a bill with a Series year before 1928 is sized 6.14 in x 2.61 in, then the bill is counterfeit.
Note Position
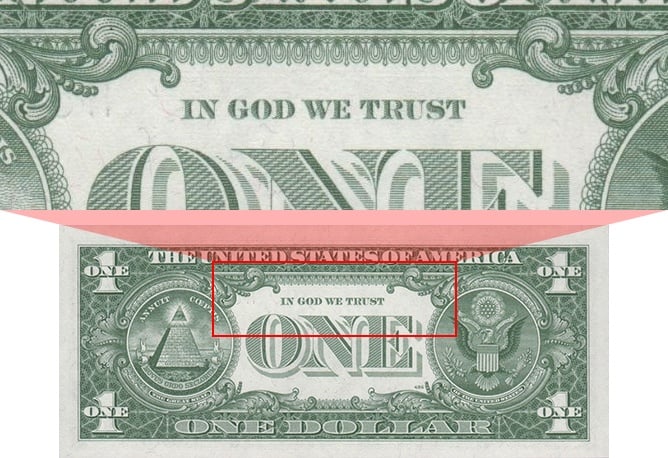
This motto was added to the backs of bills starting in 1957, following a law passed in 1955, beginning with the $1 Silver Certificate Series 1935G. No bills issued in 1956 and earlier have this motto and all bills that were issued as Series 1963B or later have this motto.
The following lists the series in which the motto “In God We Trust” was first included on each denomination; if “In God We Trust” is on a series prior to those listed below, if “In God We Trust” is not on a series listed below/series after those listed below, or if any bill that is Series 1963B or later does not have “In God We Trust”, then the bill is counterfeit:
- $1: Series 1963; $1 (Silver Certificates): Series 1935G
- $2: Series 1976; $2 (United States Note): Series 1963
- $5: Series 1963
- $10: Series 1963
- $20: Series 1963
- $50: Series 1963A
- $100: Series 1963A
"Will Pay to the Bearer on Demand" Clause
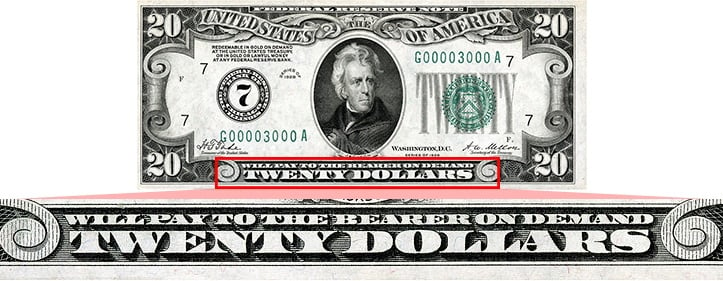
Prior to 1963, the clause “WILL PAY TO BEARER ON DEMAND” was included on notes. This was the due to the fact that until then, the value of the dollar was backed by silver; you could take the bill to the Treasury or financial institution and exchange it for its equivalent value in silver (dollars). The price of silver exceeded the value of the dollar in 1963 and so banknotes were no longer backed by silver, prompting the removal of the clause.
Beginning with Series 1963 (and Series 1963A for the $50 and $100 bills), the clause was removed completely.
If a $1, $2, $5, $10, $20 bill Series 1963 and after has the clause or if those same denominations prior to Series 1963 do not have the clause, then the bill is counterfeit. If a $50 or $100 bill Series 1963A and after has the clause or if those two denominations prior to Series 1963 do not have the clause, then the bill is counterfeit.
Serial Numbers
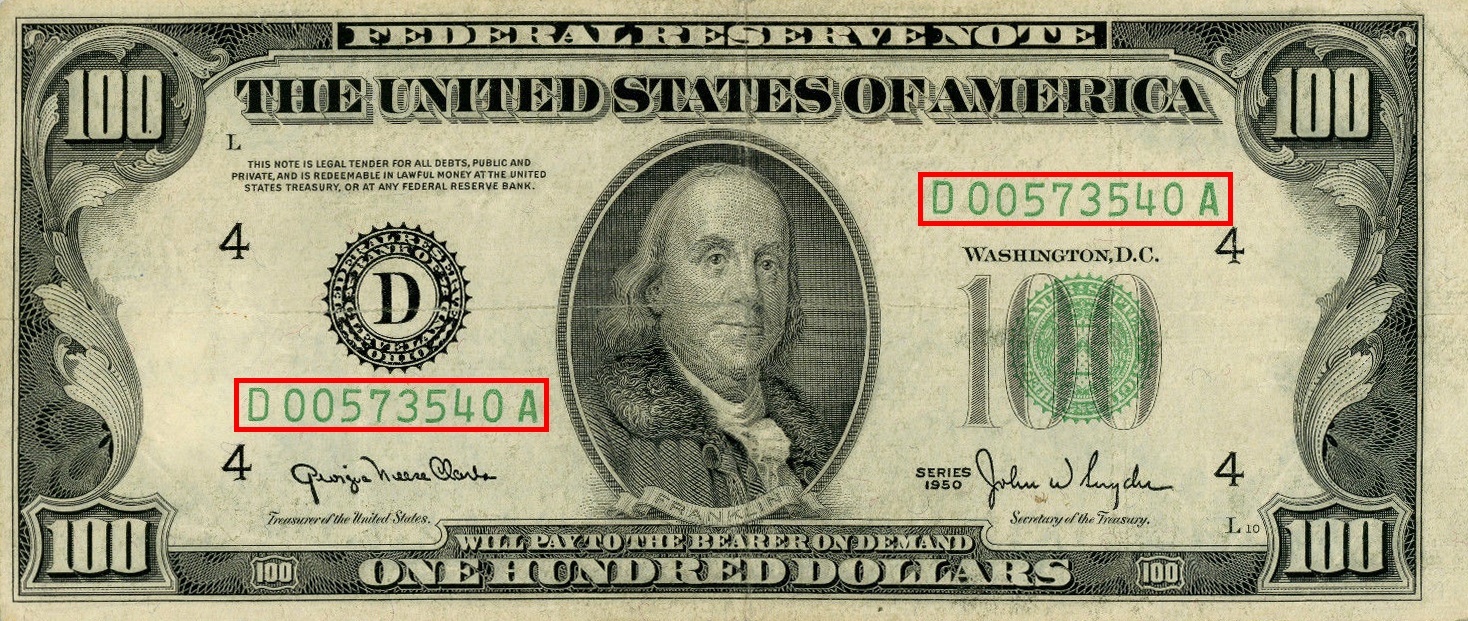
Each serial number is made up of a combination of either ten or eleven letters and numbers and appears twice on the front of each bill.
On the $1 and $2 bills, the amount of letters and numbers should total exactly eleven.
If there is a different amount than eleven letters/numbers on a $1 or $2 bill or if there are less than or more than either ten or eleven letters/numbers in the serial number on all other bills, the bill is a counterfeit.
Federal Reserve Bank Seal
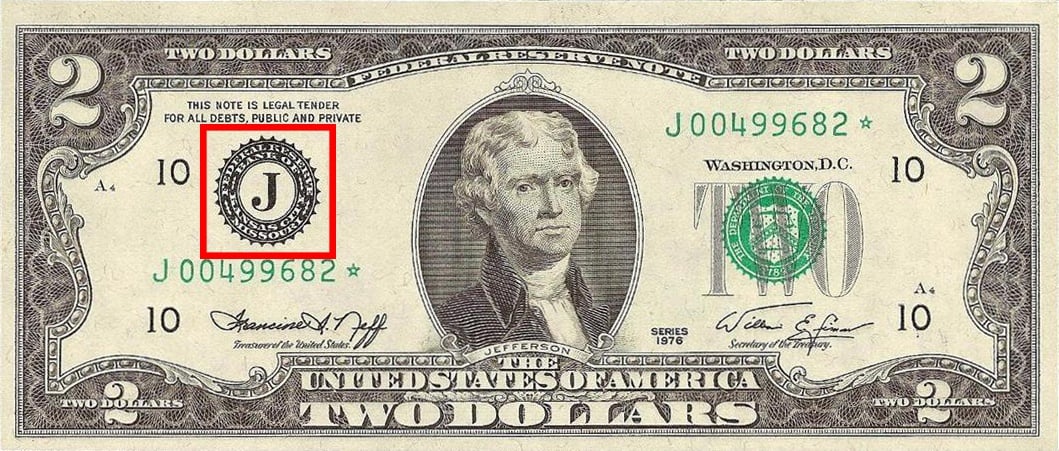
There should be a black Federal Reserve Bank Seal to the left of the portrait on the front of the bill. Within the black borders of the seal, the name of the Federal Reserve Bank that distributed the bill should appear as wrapped text along the border. A letter that corresponds to the Federal Reserve Bank that distributed the bill should appear in the middle, in black text.
There are a total of twelve possible Federal Reserve Banks; their corresponding letters are listed below. If either a letter that does not appear below exists on the bill or if the letter and the Federal Reserve Bank do not match each other on the bill, then the bill is counterfeit.
- A = Boston
- B = New York City
- C = Philadelphia
- D = Cleveland
- E = Richmond
- F = Atlanta
- G = Chicago
- H = St. Louis
- I = Minneapolis
- J = Kansas City, MO
- K = Dallas
- L = San Francisco
Federal Reserve Number
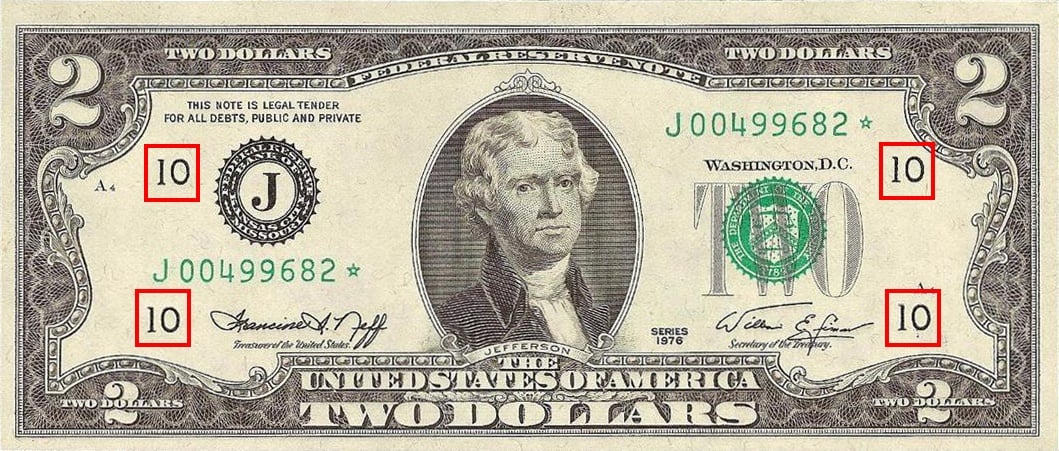
There should be Federal Reserve number that appears 4 times on the front of the bill – once iteration at each corner. This Federal Reserve number corresponds to the Federal Reserve Bank’s letter found within the Federal Reserve Bank Seal.
The number that corresponds to each Federal Reserve Bank and its letter is listed below. If a bill’s Federal Reserve number does not correspond to the Federal Reserve Bank letter as listed below, then the bill is counterfeit:
- 1 = A = Boston
- 2 = B = New York City
- 3 = C = Philadelphia
- 4 = D = Cleveland
- 5 = E = Richmond
- 6 = F = Atlanta
- 7 = G = Chicago
- 8 = H = St. Louis
- 9 = I = Minneapolis
- 10 = J = Kansas City, MO
- 11 = K = Dallas
- 12 = L = San Francisco
Treasury Seal
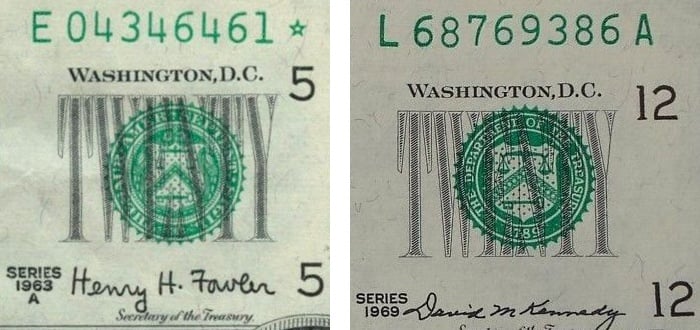
A green Treasury Seal should appear to the right of the portrait, with an overlay of denomination spelled out in grey text. Within the green borders of the seal, the inscription “THE DEPARTMENT OF THE TREASURY 1789” should appear as wrapped text along the border; “1789” should be centered at the bottom. The seal represents the U.S. Department of the Treasury.
If you have a banknote that is Series 1963B or before, the inscription should instead be “THESAUR. AMER. SEPTENT. SIGIL.” , with stars in the space that separate each word; this is Latin for “The Seal of the Treasury of North America”.
If the Latin inscription appears on bills Series 1969 and later, if the English inscription appears on bills Series 1963B and before, or if the inscription is simply not correct, then the bill is counterfeit.
Signatures
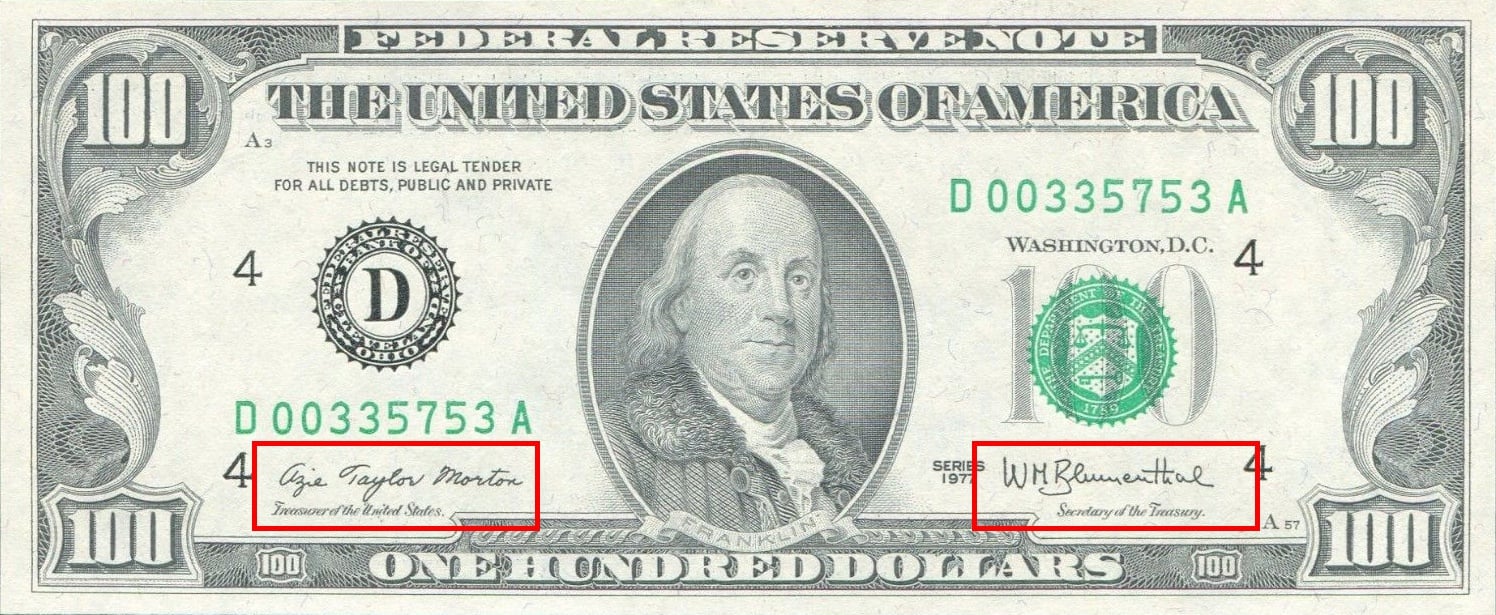
There should be two signatures that appear on the front of the bill: the signature of the Treasurer of the United States at the time the bill was issued and the signature of the Secretary of the Treasury at the time the bill was issued. The Treasurer of the United States’ signature should appear to the left of the portrait and the Secretary of the Treasury’s signature should appear to the right of the portrait.
The Treasurer of the United States and the Secretary of the Treasury do not have term limits, but the person in each position tends to change every few years. The signatures of the Treasurer of the United States and the Secretary of the Treasury should match those of the persons who held those positions during the series year found on the front of the bill.
A complete list of the series years and their corresponding Treasurers of the United States and the Secretaries of the Treasury can be found within the PDF below.
If the signatures of either the Treasurer of the United States and the Secretary of the Treasury do not match that of the series year, then the bill is counterfeit.
Images on the Front & Back
The image on the front should be a portrait of a person of historical importance to the United States. The image of the back of the bill should be an event, building, or symbol of historical importance to the United States. Each denomination has its own set of front and back images. The images on the front and back of each denomination are listed below. If the images on the front and back do not correspond to their denominations as listed below, then the bill is counterfeit.
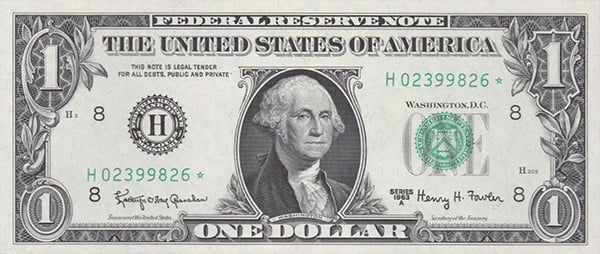
$1 FEDERAL RESERVE NOTE
The $1 Federal Reserve Note did not exist until Series 1963. If a $1 bill has a Series year prior to 1963, the bill is counterfeit.
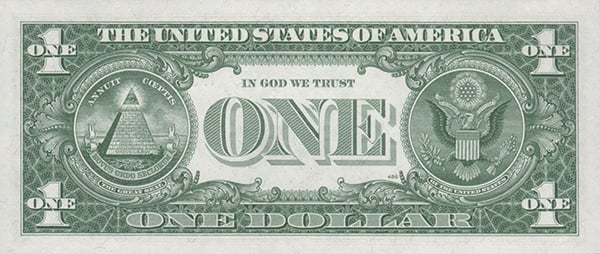
The front of the Great Seal of the United States features the national coat of arms: a bald eagle with its wings outstretched and its head turned to the left - clutching an olive branch in its right leg, thirteen arrows in its left leg, and a scroll that bears the motto “E PLURIBUS UNUM” in its beak; a depiction of a halo of light sits above the eagle with 13 stars in the middle and a shield in front of the eagle.
The back of the Great Seal of the United States features an unfinished pyramid, with 13 rows of brick, the text “MDCCLXXVI” (the year “1776” written in Roman numerals) on the bottom row of bricks, and the Eye of Providence sitting on top. The motto “ANNUIT CŒPTIS” should appear wrapped along the bottom of the top border of the seal and the motto “NOVUS ORDO SECLORUM” should appear written on a scroll and wrapped along the top of the bottom border of the seal.
“THE GREAT SEAL” is wrapped as text under the left seal and “OF THE UNITED STATES” is found wrapped as text under the right seal.
$2 FEDERAL RESERVE NOTE
The $2 Federal Reserve Note did not exist until Series 1976. If a $2 bill has a Series year prior to 1976, the bill is counterfeit.
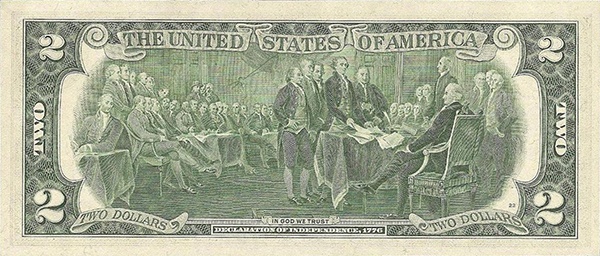
It shows the “Committee of Five” – (from left to right on the image) John Adams, Roger Sherman, Robert R. Livingston, Thomas Jefferson, and Benjamin Franklin – in the act of presenting their draft of the Declaration of Independence to Congress on June 28, 1776. The man seated at the central table is John Hancock and the man standing next to him is Charles Thomson. There are a total of 47 people in the image.
$5 FEDERAL RESERVE NOTE
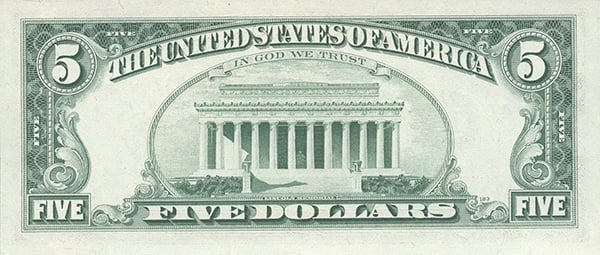
Although it may be hard to see without the aid of a magnifying glass, there are 26 states listed along the two parallel roofs, just like the actual Lincoln Memorial. Along the shorter, upper roof, the states are listed as follows: ARKANSAS, MICHIGAN, FLORIDA, TEXAS, IOWA, WISCONSIN, CALIFORNIA, MINNESOTA, OREGON, KANSAS, WEST VIRGINIA, NEVADA, NEBRASKA, COLORADO, NORTH DAKOTA. Along the longer, lower roof, the states are listed as follows: DELAWARE, PENNSYLVANIA, NEW JERSEY, GEORGIA, CONNECTICUT, MASSACHUSETTS, MARYLAND, CAROLINA, HAMPSHIRE, VIRGINIA, NEW YORK.
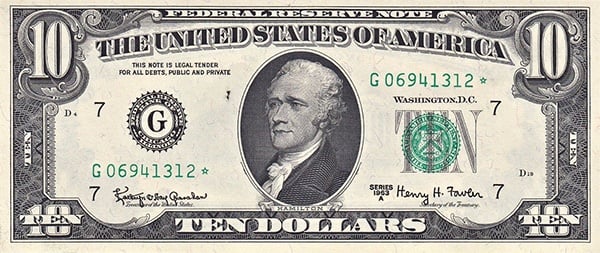
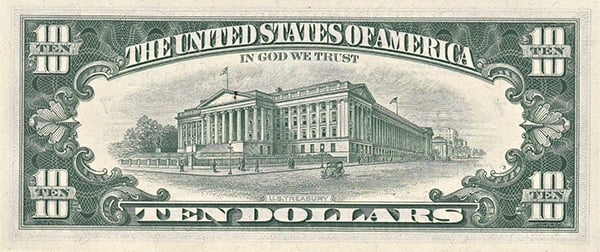
$10 FEDERAL RESERVE NOTE
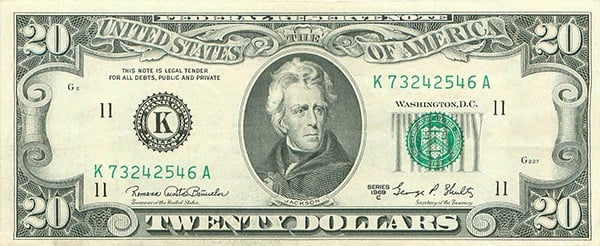
$20 FEDERAL RESERVE NOTE
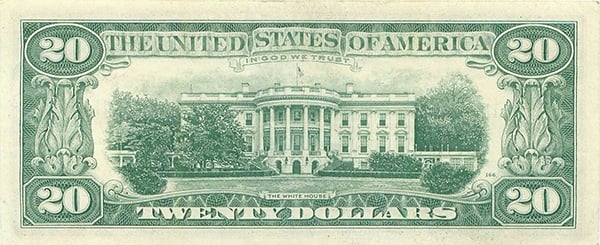
Bills that were issued after 1948 (Series 1934C and later) have an updated depiction of the White House as seen from the South Lawn: the Truman Balcony was included and the surrounding trees were drawn to be larger and higher in number.
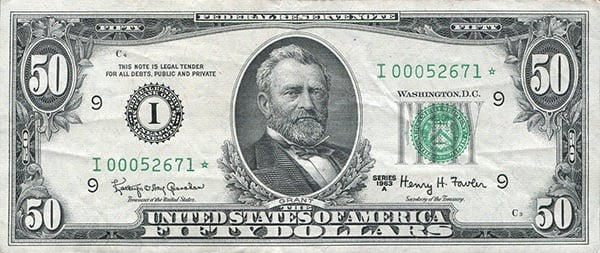
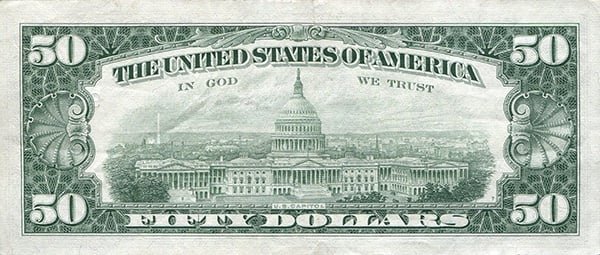
$50 FEDERAL RESERVE NOTE
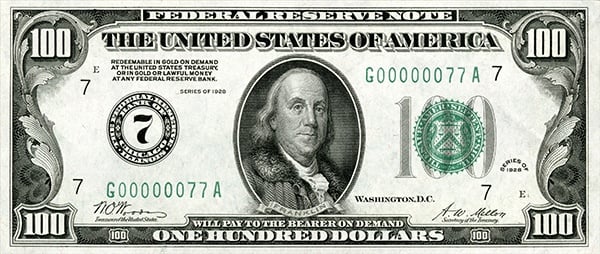
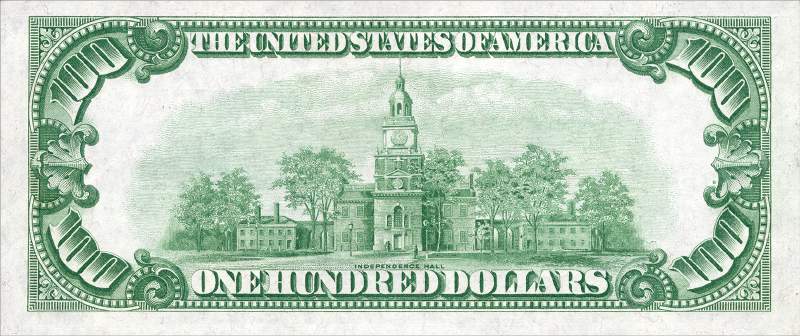
$100 FEDERAL RESERVE NOTE
For a handy PDF that shows what each older banknote denomination looks like and lists the design features above, please click here.
Looking for information on how to authenticate newer banknotes? Check out our recent post on just that.


.png)